Dockerに慣れる : 一時的にコンテナ内の情報を変更する
- created
- 2020-06-24
- last change
- 2020-06-26 11:23:39 +0000
コンテナ内を変更したい
Dockerに慣れる : コンテナを操作する で起動と終了とプロセス削除まで行うことができた。ひとまず Hello world ができた感じがするので、次は内部に変更を加えてみる。 ただし、内部の変更はコンテナを再起動させてしまったら消えてしまうらしい。
Dockerコンテナは「スナップショット」とよばれるイメージファイルとしてその状態を保持しています。
Dockerイメージは「ファイルシステム全体の状態を保持したスナップショット」であり、 runコマンドでそのスナップショットをコンテナとして再現しています。
起動したコンテナはstop中も状態保持されていますが、rmするとスナップショットごと 破棄されます。
つまり、コンテナに内部変更を行いそれを残したい場合には、「新たなイメージとして保存」する必要があります。
このページで紹介されている新しいイメージとして保存する方法は、ある程度修正や機能追加が完了した後、 つまりサービスとしてコンテナを公開する時に利用することになりそうだ。 この方法以外に、
今回は、Dockerにおける「マウント」について確認していきます。
「マウント」とは、ホスト側(コンテナの外)にあるディレクトリ・ファイルを、コンテナの中から利用できるようにする機能です。
マウントには3つの種類があります。
- 1.バインドマウント(bind)
- Dockerホストのファイルやディレクトリをコンテナ上にマウントする機能です。 バインドマウントを行うと、コンテナの外にあるファイルを、コンテナの中から読み書き可能になります。
- 2.ボリュームマウント(volume)
- Docker が管理するデータ領域を コンテナ上にマウントする機能です。 バインドマウントとの違いは、バインドマウントが「Dockerが管理するデータ領域以外もマウント可能である」ことに対し、 ボリュームマウントは「Dockerが管理するデータ領域内でのマウントのみ可能である」という点です。
- 3.一時ファイルシステムのマウント(tmpfs)
- Dockerホストにファイルとして保存したくないデータを一時的に利用できるようにする(データ領域をメモリ上に置く)機能です。
と、コンテナ外のディレクトリを共有してコンテナの起動・終了の影響を受けないようにする方法があるようだ。
この記事ではコンテナ内部の変更と、再度コンテナプロセスを動作させた時に変更が消去されていることを確認する。
参考:
- 【Docker】第3回 コンテナのライフサイクルとイメージの作成/札幌のAI・IoT・システム開発|ITイノベーション/最先端技術|パブリックリレーションズ
- 【Docker】第5回 マウントについて(bind)/札幌のAI・IoT・システム開発|ITイノベーション/最先端技術|パブリックリレーションズ
- docker exec -itって実際は何をしてるの?【90日目】 - エンジニアのひよこ_level10
httpd -h- Apacheでhttpd: Could not reliably determine the server’s fully qualified domain nameと言われる解決方法 - Qiita
- Dockerコンテナの作成、起動〜停止まで - Qiita
- Dockerコンテナからのデタッチ | technote
コンテナ内の編集をする
まずはコンテナイメージから、httpdコンテナを立ち上げます。
$ docker run -d -p 8080:80 httpd
起動したらpsコマンドで、httpdコンテナのIDを確認します。
$ docker psCONTAINER ID IMAGE COMMAND CREATED STATUS PORTS NAMES 59f1b165c15d httpd "httpd-foreground" 3 seconds ago Up 2 seconds 0.0.0.0:8080->80/tcp relaxed_mcclintock現在バックグラウンドで起動している状態ですので、execコマンドでコンテナの内部に入ります(指定したコンテナの中でbashプロセスを実行する)。
docker exec -it 59f1b165c15d /bin/bash次にWebページを編集するのですが、現在の状態ではコンテナ上にエディタがインストールされていないので、先にインストールを行っておきます。
apt-get update
apt-get install vim
エディタの準備ができたら、index.htmlを以下(黄色字の内容)の様に編集してみます。
vi /usr/local/apache2/htdocs/index.html<html><body><h1>httpd container working!</h1></body></html>編集を保存し、httpdを再起動します。
/usr/local/apache2/bin/httpd restartWebブラウザでページを確認すると、編集内容で更新されているはずです。
ですが、この編集内容は「このコンテナが生きている間だけ」有効なものであり、 コンテナをrmコマンドで破棄してしまうと、先ほどの編集内容(&インストールしたエディタ)も消失します。
やってみる。
まずは httpd のコンテナを起動する。
$ docker run -d -p 8080:80 httpd
32c3476e608722c2489dd4dcb9ed98ae5378e55a43660fb9e94f4b66d8ab6897
$ docker ps
CONTAINER ID        IMAGE               COMMAND              CREATED             STATUS              PORTS                  NAMES
32c3476e6087        httpd               "httpd-foreground"   7 seconds ago       Up 7 seconds        0.0.0.0:8080->80/tcp   unruffled_easley
起動確認した。このコンテナ内部のシェルを実行し、コンテナ内部のファイルを編集する。 今回はコンテナ ID ではなく、名前を使ってやってみる。
$ docker exec -it unruffled_easley /bin/bash
root@32c3476e6087:/usr/local/apache2#
内部に入れた。この時点でのディレクトリが既に /usr/local/apache2 になっていた。
引数の -it は
-it
-iは、
Keep STDIN open even if not attached標準入力を開き続ける。-tは、
Allocate a pseudo-TTY疑似ttyを割りあてる。標準入力を開き続け、そこを操作出来るようにする。 →手元の環境で、docker内入力ができるようにする
ということだそうだ。
次に、コンテナ内部のパッケージ郡をアップデートする。これには apt を用いた。
まずはパッケージリストをアップデートする。
# apt update
Get:1 http://security.debian.org/debian-security buster/updates InRelease [65.4 kB]
Get:2 http://deb.debian.org/debian buster InRelease [121 kB]
Get:3 http://deb.debian.org/debian buster-updates InRelease [51.9 kB]
Get:4 http://security.debian.org/debian-security buster/updates/main amd64 Packages [204 kB]
Get:5 http://deb.debian.org/debian buster/main amd64 Packages [7905 kB]
Get:6 http://deb.debian.org/debian buster-updates/main amd64 Packages [7868 B]
Fetched 8355 kB in 3s (3191 kB/s)
Reading package lists... Done
Building dependency tree
Reading state information... Done
1 package can be upgraded. Run 'apt list --upgradable' to see it.
アップグレードできるパッケージを確認する。
# apt list --upgradable
Listing... Done
linux-libc-dev/stable 4.19.118-2+deb10u1 amd64 [upgradable from: 4.19.118-2]
N: There is 1 additional version. Please use the '-a' switch to see it
アップグレードできるパッケージを全部表示する。
# apt list --upgradable -a
Listing... Done
linux-libc-dev/stable 4.19.118-2+deb10u1 amd64 [upgradable from: 4.19.118-2]
linux-libc-dev/stable,now 4.19.118-2 amd64 [installed,upgradable to: 4.19.118-2+deb10u1]
アップグレードする。
# apt upgrade
Reading package lists... Done
Building dependency tree
Reading state information... Done
Calculating upgrade... Done
The following package was automatically installed and is no longer required:
  lsb-base
Use 'apt autoremove' to remove it.
The following packages will be upgraded:
  linux-libc-dev
1 upgraded, 0 newly installed, 0 to remove and 0 not upgraded.
Need to get 1354 kB of archives.
After this operation, 1024 B of additional disk space will be used.
Do you want to continue? [Y/n] Y
Get:1 http://security.debian.org/debian-security buster/updates/main amd64 linux-libc-dev amd64 4.19.118-2+deb10u1 [1354 kB]
Fetched 1354 kB in 0s (4961 kB/s)
debconf: delaying package configuration, since apt-utils is not installed
(Reading database ... 9613 files and directories currently installed.)
Preparing to unpack .../linux-libc-dev_4.19.118-2+deb10u1_amd64.deb ...
Unpacking linux-libc-dev:amd64 (4.19.118-2+deb10u1) over (4.19.118-2) ...
Setting up linux-libc-dev:amd64 (4.19.118-2+deb10u1) ...
vim をインストールする。
2# apt install vim
Reading package lists... Done
Building dependency tree
Reading state information... Done
The following package was automatically installed and is no longer required:
  lsb-base
Use 'apt autoremove' to remove it.
The following additional packages will be installed:
  libgpm2 vim-common vim-runtime xxd
Suggested packages:
  gpm ctags vim-doc vim-scripts
The following NEW packages will be installed:
  libgpm2 vim vim-common vim-runtime xxd
0 upgraded, 5 newly installed, 0 to remove and 0 not upgraded.
Need to get 7425 kB of archives.
After this operation, 33.8 MB of additional disk space will be used.
Do you want to continue? [Y/n] Y
Get:1 http://deb.debian.org/debian buster/main amd64 xxd amd64 2:8.1.0875-5 [140 kB]
Get:2 http://deb.debian.org/debian buster/main amd64 vim-common all 2:8.1.0875-5 [195 kB]
Get:3 http://deb.debian.org/debian buster/main amd64 libgpm2 amd64 1.20.7-5 [35.1 kB]
Get:4 http://deb.debian.org/debian buster/main amd64 vim-runtime all 2:8.1.0875-5 [5775 kB]
Get:5 http://deb.debian.org/debian buster/main amd64 vim amd64 2:8.1.0875-5 [1280 kB]
Fetched 7425 kB in 1s (6909 kB/s)
debconf: delaying package configuration, since apt-utils is not installed
Selecting previously unselected package xxd.
(Reading database ... 9613 files and directories currently installed.)
Preparing to unpack .../xxd_2%3a8.1.0875-5_amd64.deb ...
Unpacking xxd (2:8.1.0875-5) ...
Selecting previously unselected package vim-common.
Preparing to unpack .../vim-common_2%3a8.1.0875-5_all.deb ...
Unpacking vim-common (2:8.1.0875-5) ...
Selecting previously unselected package libgpm2:amd64.
Preparing to unpack .../libgpm2_1.20.7-5_amd64.deb ...
Unpacking libgpm2:amd64 (1.20.7-5) ...
Selecting previously unselected package vim-runtime.
Preparing to unpack .../vim-runtime_2%3a8.1.0875-5_all.deb ...
Adding 'diversion of /usr/share/vim/vim81/doc/help.txt to /usr/share/vim/vim81/doc/help.txt.vim-tiny by vim-runtime'
Adding 'diversion of /usr/share/vim/vim81/doc/tags to /usr/share/vim/vim81/doc/tags.vim-tiny by vim-runtime'
Unpacking vim-runtime (2:8.1.0875-5) ...
Selecting previously unselected package vim.
Preparing to unpack .../vim_2%3a8.1.0875-5_amd64.deb ...
Unpacking vim (2:8.1.0875-5) ...
Setting up libgpm2:amd64 (1.20.7-5) ...
Setting up xxd (2:8.1.0875-5) ...
Setting up vim-common (2:8.1.0875-5) ...
Setting up vim-runtime (2:8.1.0875-5) ...
Setting up vim (2:8.1.0875-5) ...
update-alternatives: using /usr/bin/vim.basic to provide /usr/bin/vim (vim) in auto mode
update-alternatives: using /usr/bin/vim.basic to provide /usr/bin/vimdiff (vimdiff) in auto mode
update-alternatives: using /usr/bin/vim.basic to provide /usr/bin/rvim (rvim) in auto mode
update-alternatives: using /usr/bin/vim.basic to provide /usr/bin/rview (rview) in auto mode
update-alternatives: using /usr/bin/vim.basic to provide /usr/bin/vi (vi) in auto mode
......(中略).....
Processing triggers for libc-bin (2.28-10) ...
index.html を編集する。
# vim htdocs/index.html
<html><body><h1>httpd cotainer working!</h1></body></html>
httpd を再起動する。
# /usr/local/apache2/bin/httpd -k restart
引用元の方法と引数が異なっている。
Usage: /usr/local/apache2/bin/httpd [-D name] [-d directory] [-f file]
                                    [-C "directive"] [-c "directive"]
                                    [-k start|restart|graceful|graceful-stop|stop]
                                    [-v] [-V] [-h] [-l] [-L] [-t] [-T] [-S] [-X]
Options:
  -D name            : define a name for use in <IfDefine name> directives
  -d directory       : specify an alternate initial ServerRoot
  -f file            : specify an alternate ServerConfigFile
  -C "directive"     : process directive before reading config files
  -c "directive"     : process directive after reading config files
  -e level           : show startup errors of level (see LogLevel)
  -E file            : log startup errors to file
  -v                 : show version number
  -V                 : show compile settings
  -h                 : list available command line options (this page)
  -l                 : list compiled in modules
  -L                 : list available configuration directives
  -t -D DUMP_VHOSTS  : show parsed vhost settings
  -t -D DUMP_RUN_CFG : show parsed run settings
  -S                 : a synonym for -t -D DUMP_VHOSTS -D DUMP_RUN_CFG
  -t -D DUMP_MODULES : show all loaded modules
  -M                 : a synonym for -t -D DUMP_MODULES
  -t -D DUMP_INCLUDES: show all included configuration files
  -t                 : run syntax check for config files
  -T                 : start without DocumentRoot(s) check
  -X                 : debug mode (only one worker, do not detach)
この内容から -k オプションを追加した。
ところが、以下の警告がでた。
AH00558: httpd: Could not reliably determine the server's fully qualified domain name, using 172.17.0.2. Set the 'ServerName' directive globally to suppress this message
httpd.conf に ServerName を書けばいいみたいです。
vi /etc/httpd/conf/httpd.conf

ServerName hogepiyo:80
ServerName に hogepiyo のように何か適当な文字列を書きます。
ということなので、 conf/httpd.conf を編集する。
# vim conf/httpd.conf
...(中略)...
#
# ServerName gives the name and port that the server uses to identify itself.
# This can often be determined automatically, but we recommend you specify
# it explicitly to prevent problems during startup.
#
# If your host doesn't have a registered DNS name, enter its IP address here.
#
#ServerName www.example.com:80
ServerName test
...(中略)...
もう一度再起動させてみる。
# /usr/local/apache2/bin/httpd -k restart
#
エラーなく再起動できた。ブラウザで確認してみる。
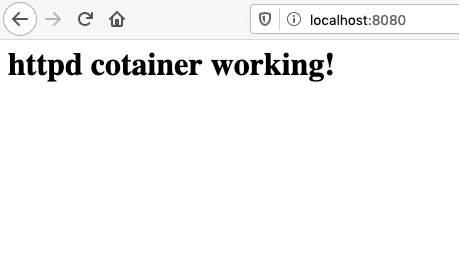
index.html の内容変更が反映された。
コンテナのターミナルからホストに戻るのだが、
docker attach後にexitコマンドで抜けると停止します。root@0b5aad08487b:/# exit exit
exit で抜けてしまうと、コンテナが停止してしまう。
Dockerコンテナで作業をしていて、コンテナから抜けたいが、単に
control-Dで抜けようとすると logout になりコンテナは終了してしまう。これを回避する方法である。[control-P] [control-Q]上記でコンテナからデタッチすることができる。
デタッチすることでホストに戻ることができるらしい。やってみる。
# read escape sequence
$ docker ps
CONTAINER ID        IMAGE               COMMAND              CREATED             STATUS              PORTS                  NAMES
32c3476e6087        httpd               "httpd-foreground"   6 hours ago         Up 6 hours          0.0.0.0:8080->80/tcp   unruffled_easley
できたらしい。
実際に変更が消えてしまうか確認する。 httpd を終了させてプロセスを消去する。
$ docker ps
CONTAINER ID        IMAGE               COMMAND              CREATED             STATUS              PORTS                  NAMES
32c3476e6087        httpd               "httpd-foreground"   6 hours ago         Up 6 hours          0.0.0.0:8080->80/tcp   unruffled_easley
$ docker stop unruffled_easley
unruffled_easley
$ docker rm unruffled_easley
unruffled_easley
$ docker ps -a
CONTAINER ID        IMAGE               COMMAND             CREATED             STATUS              PORTS               NAMES
そしてもう一度プロセスを実行する。
$ docker run -d -p 8080:80 httpd
7138649b52849998d5733b7b6461e7b0f6710b1fc03533323c7ae79d82586e9c
ブラウザでアクセスしてみる。
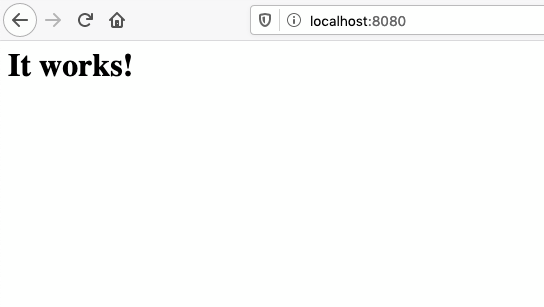
index.html がもとに戻った。
Technical Note
Docker Top
Basic
- Dockerに慣れる : コンテナを操作する
- Dockerに慣れる : コンテナの使われ方
- Dockerに慣れる : 一時的にコンテナ内の情報を変更する
- Dockerに慣れる : 変更したコンテナイメージを保存する
- Dockerに慣れる : 不要なコンテナイメージを消去する
- Dockerに慣れる : Dockerfile について
- Dockerに慣れる : ボリュームをマウントする
- Dockerに慣れる : docker-compose
- Dockerに慣れる : コンテナ間のネットワークについて
ASP.NET Core
- ASP.NET Core SDK コンテナを動かす
- ASP.NET Core SDK コンテナでWebアプリを動かす
- ASP.NET Core SDK コンテナにディレクトリをマウントする
- ASP.NET Core SDK コンテナで動作しているプログラムを変更する