サポートされていないPCIカードをThunderbolt3 PCI ボックスで動かす
- created
- 2018-05-27
- last change
- 2018-07-03 16:04:04 +0000
正規動作品の高スペックはいらない。値段高いし
AVB用にThunderbolt3-Ethernet変換をどうしようか散々悩んだ挙げ句、PCI拡張ボックスを購入。 しかし、動作確認済みのPCIは 10GbE 対応だったり、やたらと値段が高額だったりする。
AVB用途であれば GbE あれば問題ない。10GbE はもっと普及し、値段が落ち着いてからで問題ないので、 GbE 対応の安価なPCIカードを購入。こちらをが動作するまでをまとめる。
なお、この方法を応用すれば Apple がドライバを提供しているチップが搭載された、 別ベンダーの安価な製品を導入することも不可能ではなさそう。
全て動作保証外の自己責任です。 システム情報を直接書き換えるため、最悪の場合macOSが立ち上がらなくなります。 書き換える前にTime Machineによるバックアップや書き換える前のファイルを別途コピーしておいて万が一の状態に備えましょう。
ちなみに2回ほど試行錯誤の最中に IONetworkingFamily.kext をTime Machineから復元させています。
参考:
- Intel Gigabit CT Desktop Adapter | tonymacx86.com
- Intel Gigabit CT kext for macOS Sierra 10.12 | trick77.com
- HP Pavilion Elite e9180t でLionが動く夢 |Kanameのブログ
- IBM Knowledge Center - id コマンド
- Writing a Driver for a PCI Device
- How to Install Kernel Extensions in Mac OS X Manually
- Manually installing kexts issue | tonymacx86.com
- How to manually install kexts in 10.11 from the shell? : hackintosh
Macが公式で対応しているドライバを確認する
まずは安いNICの搭載されているコントローラの型番から、Macintoshにドライバが存在するものを検索した。 NICの場合、MacintoshだとIntelからBroadcom辺りのものを利用していそうなのでこれらメーカーのコントローラが搭載されているNICを検索する。
The Intel Gigabit CT Desktop Adapter has an Intel 82574L ethernet controller on it. This is the same controller used in the new Mac Pros, and as such, Apple generously provides the kext for us. We just need to add our Ethernet controller’s device id to the list of supported devices in the kext itself.
Open
/System/Library/Extensions/IONetworkingFamily.kext/Contents/PlugIns/Intel82574L.kext/Contents/Info.plist
上記の通り、Intel 82574Lというコントローラのドライバが、Appleから提供されていることを自分のコンピュータで確かめてみる。

/System/Library/Extensions/IONetworkingFamily.kext/Contents/PlugIns
に存在することを確認した。
kextファイルは 右クリック -> パッケージの内容を表示 とすることで中身を表示することができる。
ドライバがあることを確認できたので 82574L を搭載しているNIC、 EXPI9301CT を購入することにした。
EXPI9301CTを認識しない
購入したはいいが、全然認識しない。
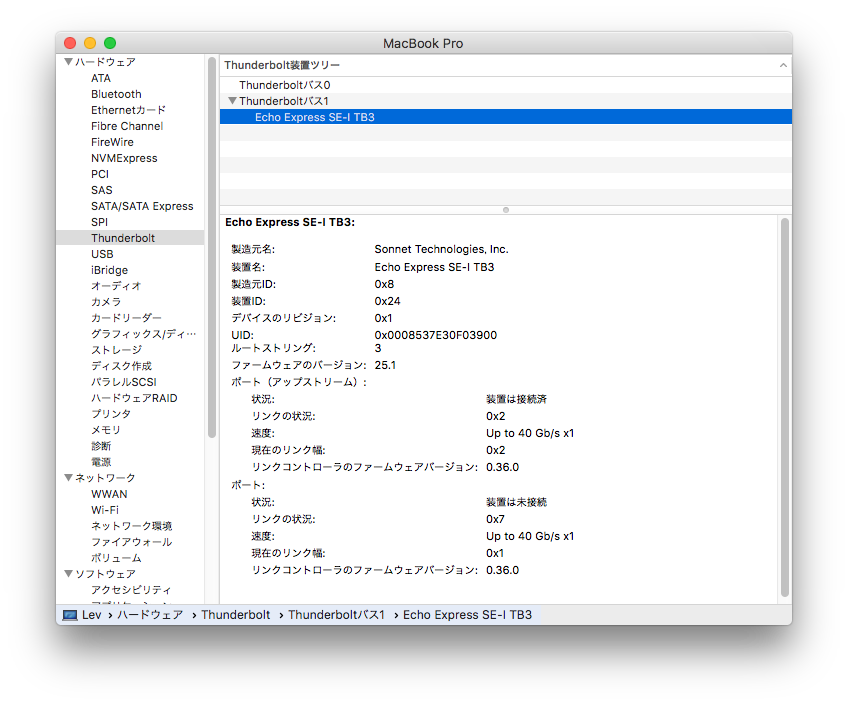
SONNET Echo Express SE I は認識している。
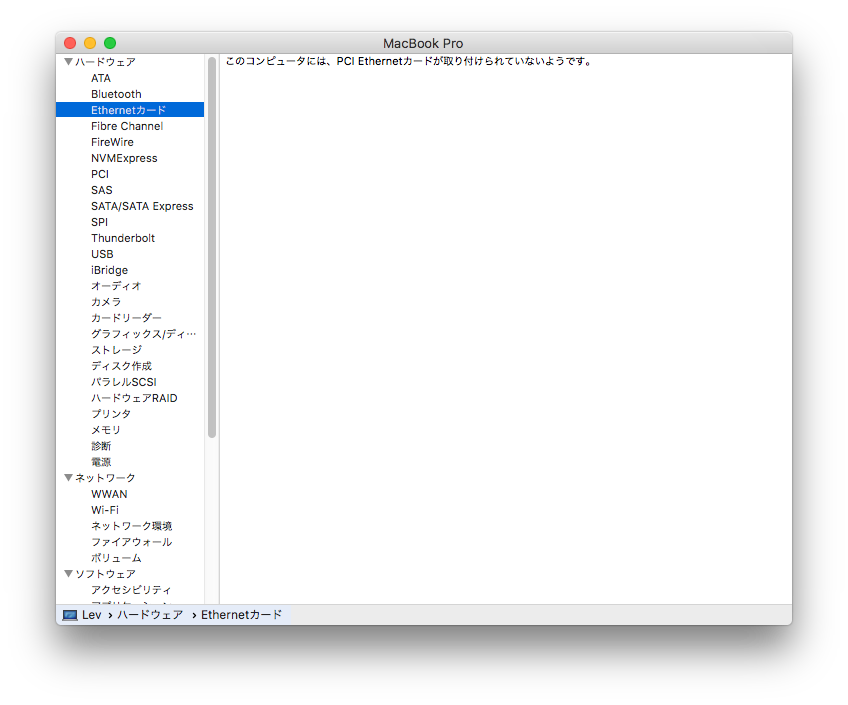
Ethernetカードを全く認識しない。
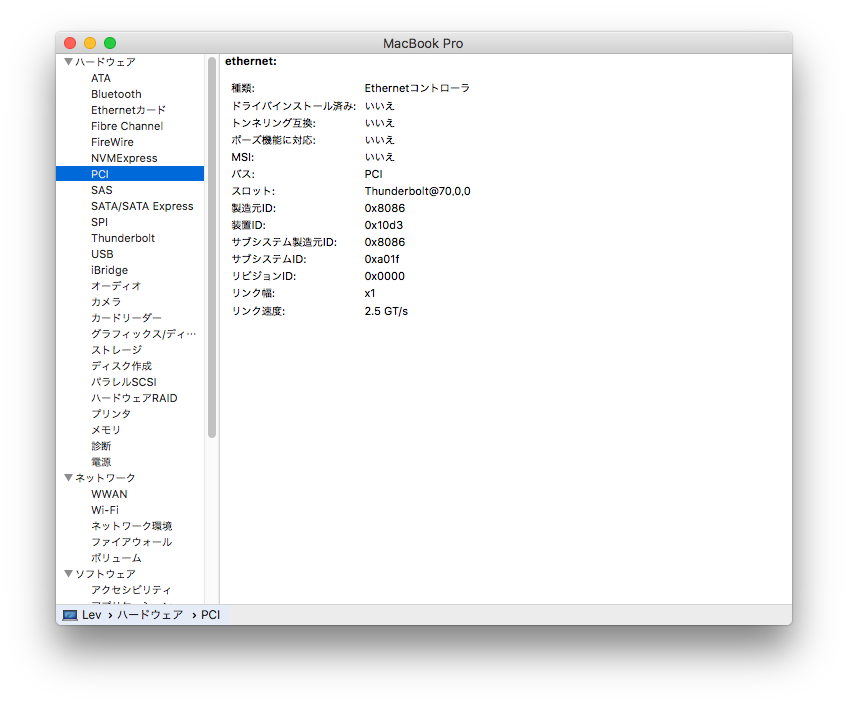
PCI上では存在している。
どうやら EXPI9301CT が 82574L ドライバと関連づけられていないようだ。
SIPのレベルを下げる
Open
/System/Library/Extensions/IONetworkingFamily.kext/Contents/PlugIns/Intel82574L.kext/Contents/Info.plist
and edit the following lines:
<key>IOClass</key>
<string>Intel82574L</string>
<key>IOPCIPrimaryMatch</key>
- Change
<key>IOPCIPrimaryMatch</key>to<key>IOPCIMatch</key>.- Add your Ethernet Controller’s uid to the list in the line right after the
<key>IOPCIMatch</key>line. My id is0x10D38086. The simple way to find out what it is is to use Windows Device Manager. What you will see is something likePCI\VEN_8086&DEV_10D3&SUBSYS…Now what you need is the numbers/letters following VEN and DEV. These are your vender and device ID numbers. My Vendor ID is8086and my Device ID is10D3.
先ほどのページ、どうやらHackintoshに関するページで、今回購入した EXPI9301CT をHackintosh側で認識させるための内容が書かれているようだ。 これに沿ってドライバ情報を編集すれば動作するみたいだが、/System 以下を編集することができない。
The Hackintosh is still running in full protected mode (if enabled in Clover):
$ csrutil status
System Integrity Protection status: enabled.
csrutilを用いて
- 署名されていない、または改造した kext を読み込む
- ファイルシステムの編集を許可
以上2点の許可をしなければならない。詳細は以下にまとめた。
Macに怪しげなデバイスドライバを入れたり、ドライバを改造したりする準備方法
上記のページの最後、以下のコマンドをリカバリモードで実行し、
# csrutil enable --without kext --without fs
csrutil: requesting an unsupported configuration. This is likely to break in the future and leave your machine in an unknown state.
csrutil: requesting an unsupported configuration. This is likely to break in the future and leave your machine in an unknown state.
Successfully enabled System Integrity Protection. Please restart the machine for the changes to take effect.
結果を通常モードで確認する。
$ csrutil status
System Integrity Protection status: enabled (Custom Configuration).

Configuration:
	Apple Internal: disabled
	Kext Signing: disabled
	Filesystem Protections: disabled
	Debugging Restrictions: enabled
	DTrace Restrictions: enabled
	NVRAM Protections: enabled
	BaseSystem Verification: enabled

This is an unsupported configuration, likely to break in the future and leave your machine in an unknown state.
Intel82574L.kext のバックアップを作成する
いよいよ公式のドライバを書き換えるが、その前にバックアップをしておく。 デフォルトの状態の Intel82574L.kext をデスクトップにコピーする。

デスクトップにドラッグ&ドロップ
Intel82574L.kext 内の Info.plist をコピーして編集する
同様に、 Intel82574L.kext 内の Infor.plist をデスクトップなどにコピーして編集する。 最終的に編集が終了したものを Intel82574L.kext に戻す形で変更を反映させる。
どのように編集するかというと
Open
/System/Library/Extensions/IONetworkingFamily.kext/Contents/PlugIns/Intel82574L.kext/Contents/Info.plist
and edit the following lines:
<key>IOClass</key>
<string>Intel82574L</string>
<key>IOPCIPrimaryMatch</key>
- Change
<key>IOPCIPrimaryMatch</key>to<key>IOPCIMatch</key>.Add your Ethernet Controller’s uid to the list in the line right after the
<key>IOPCIMatch</key>line. My id is0x10D38086. The simple way to find out what it is is to use Windows Device Manager. What you will see is something likePCI\VEN_8086&DEV_10D3&SUBSYS…Now what you need is the numbers/letters following VEN and DEV. These are your vender and device ID numbers. My Vendor ID is8086and my Device ID is10D3.Info.plist should look like this:
 <key>IOClass</key>
 <string>Intel82574L</string>
 <key>IOPCIMatch</key>
 <string>0x10D38086 0x104b8086 0x10f68086</string>
 <key>IOPCISecondaryMatch</key>
 <string>0x00008086 0x00000000</string>
 <key>IOProviderClass</key>
 <string>IOPCIDevice</string>
 <key>IOResourceMatch</key>
 <string>IOKit</string>
Remove the lines that say
<key>IOPCISecondaryMatch</key>, and also remove the line<string>0x00008086 0x00000000</string>.Info.plist should now look like this:
 <key>IOClass</key>
 <string>Intel82574L</string>
 <key>IOPCIMatch</key>
 <string>0x10D38086 0x104b8086 0x10f68086</string>
 <key>IOProviderClass</key>
 <string>IOPCIDevice</string>
 <key>IOResourceMatch</key>
 <string>IOKit</string>
以上のようにいろいろ書いてあるがもう少し調べる。
PCI Matching
PCI device drivers can base their property matching on the PCI configuration space registers for vendor and device ID (offsets 0x00 and 0x02), subsystem vendor and device ID (offsets 0x2C and 0x2E), and class code (offset 0x09). Other registers, such as revision ID and header type, are not available in property matching and must be examined by the probe method. The PCI matching dictionary keys are:
Key Matching behavior IOPCIMatchMatches against the primary vendor/device ID registers or the subsystem vendor/device ID registers. The primary IDs are checked first; if either of these doesn’t match then the subsystem IDs are checked. IOPCIPrimaryMatch Matches only against the primary vendor/device ID registers. IOPCISecondaryMatch Matches only against the subsystem vendor/device ID registers. IOPCIClassMatch Matches against the class code register.
フォーラムの投稿では IOPCISecondaryMatchとそれに付随するIDを消去するように書かれているが、
こちらに サブシステムID 及び サブシステム製造元ID を記入することでも動作させることができそうだ。
製造元ID、 装置ID、 サブシステムID、サブシステム製造元ID は
このMacについて -> システムレポート -> ハードウェア -> PCI の項目で確認することができる。
今回の場合
- 製造元ID
- 0x8086
- 装置ID
- 0x10d3
- サブシステム製造元ID
- 0x8086
- サブシステムID
- 0xa01f
これらを _Info.plist_に反映させるとこうなる。
<string>Intel82574L</string>
<key>IOPCIPrimaryMatch</key>
<string>0x10d38086 0x104b8086 0x10f68086</string>
<key>IOPCISecondaryMatch</key>
<string>0xa01f8086 0x00008086 0x00000000</string>
IOPCIPrimaryMatch、IOPCISecondaryMatch共に
0x[(Sub)SystemID][(Subsystem)VendorID]
となることに注意する。ここまで編集した Info.plist を Intel82574L.kext 内の元の位置に戻して上書きする。
/System/Library/Extensions 内のアクセス権を修復する
Type the following commands at the terminal, replacing the kext name with the one you are installing
sudo chmod -R 755 kextfile.kext
sudo chown -R root:wheel kextfile.kext
自分で編集した Info.plist_の編集権限が通常と異なっているのでシステムファイルのアクセス権を修復する。 _/System/Library/Extensions 内のアクセス権は基本上記の設定で問題ので
sudo chmod -R 755 /System/Library/Extensions/*
sudo chown -R root:wheel /System Library/Extensions/*
を実行すればよい。他の記述方法として
Set modes and ownership:
chmod -R 755 /System/Library/Extensions/Awesome.kext
chown -R 0:0 /System/Library/Extensions/Awesome.kext
というものも見つけた。
id コマンドは、指定されたユーザーのシステム識別 (ID) を含むメッセージを標準出力に書き出します。 システム ID は、ユーザーとユーザー・グループをシステムに対して識別する番号です。 システム ID は、システムがユーザーとユーザー・グループを識別するための番号です。 id コマンドは、該当する場合に以下の情報を書き込みます。
現行ユーザーのすべてのシステム識別を表示するには、次のように入力します。
idid コマンドの出力は以下のフォーマットで表示されます。
uid=1544(sah) gid=300(build) euid=0(root) egid=9(printq) groups=0(system),10(audit)
通常のアクセス権でidを実行してみると
$ id
uid=501(leico_studio)
gid=20(staff)
groups=20(staff),
701(com.apple.sharepoint.group.1),
12(everyone),
61(localaccounts),
79(_appserverusr),
80(admin),
81(_appserveradm),
98(_lpadmin),
33(_appstore),
100(_lpoperator),
204(_developer),
395(com.apple.access_ftp),
398(com.apple.access_screensharing),
399(com.apple.access_ssh),
702(com.apple.sharepoint.group.2)
sudo 権限で実行してみると
$ sudo id
uid=0(root)
gid=0(wheel)
groups=0(wheel),
1(daemon),
2(kmem),
3(sys),
4(tty),
5(operator),
8(procview),
9(procmod),
12(everyone),
20(staff),
29(certusers),
61(localaccounts),
80(admin),
701(com.apple.sharepoint.group.1),
33(_appstore),
98(_lpadmin),
100(_lpoperator),
204(_developer),
395(com.apple.access_ftp),
398(com.apple.access_screensharing),
399(com.apple.access_ssh),
702(com.apple.sharepoint.group.2)
chown -R 0:0 はchown -R root:wheel を userID:groupID で指定しただけで同じもののようだ。
kextキャッシュを再構築する
最後にkextを再読込、キャッシュを再構築させる。
In Terminal :
sudo kextcache -i /Press return, type your password (it will not show on screen), press return again and when the command has completed restart.
これを実行して、さらに念の為再起動をして EXPI9301CT 認識するか確認する。
ドライバの改造を試行錯誤する場合、ファイルを更新するたびに上記3つのコマンドを実行するようにするべきだろう。
$ sudo chown -R 0:0 /System/Library/Extensions/*
$ sudo chmod -R 755 /System/Library/Extensions/*
$ sudo kextcache -i /
kext-dev-mode allowing invalid signature -67030 0xFFFFFFFFFFFEFA2A for kext Intel82574L.kext
kext-dev-mode allowing invalid signature -67030 0xFFFFFFFFFFFEFA2A for kext IONetworkingFamily.kext
KernelCache ID: 296EE9337ED4F9600790ECD041F1F968
署名が不正であると警告が出るが、問題なくロードすることができる。

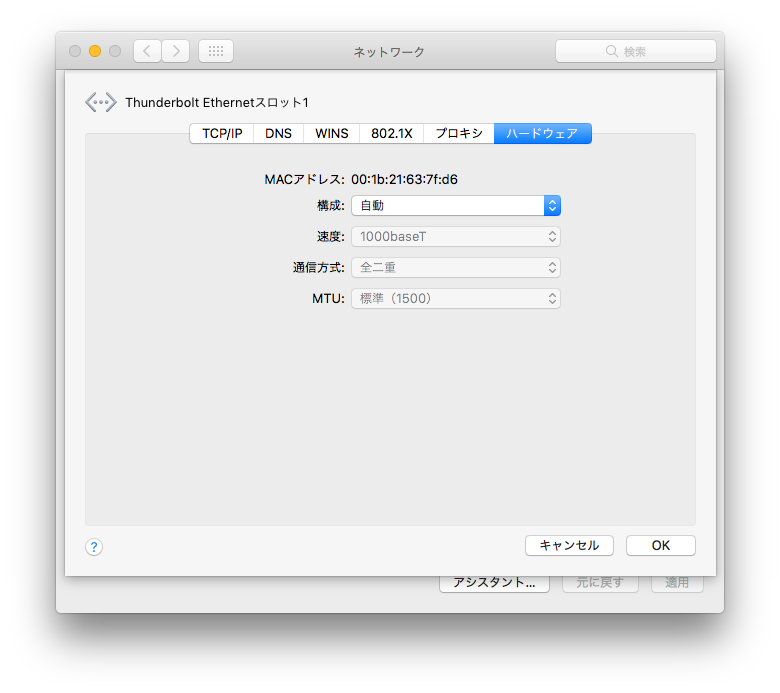
成功すればネットワーク環境設定に Thunderbolt Ethernet スロット が生まれ、接続できるようになる。
ところで、私はAVBネットワークに接続するために XCPI9301CT を購入したのだが・・・。
XCPI9301CTはAVBに対応していない・・・。
Technical Note
Mac Tips Top
Homebrew
- Homebrew : nodenv を用いて Node.js の環境構築を行う
- homebrew : Python3 をアンインストールして pyenv からインストールし直す
- Homebrewを /Applications ディレクトリにインストールする
Homebrew 関連記事
Tips
- Catalina で 1TB → 4TB の TimeMachine へHDDを移行する
- Catalina から zsh になって bash_profile が利用できなくなった
- Time Machine 用 HDD を移行しようとして時間を無駄にしつつ解決するまで
- MOTU AVB シリーズのディジタルミキサーを使用する
- Macでキーボード入力を表示させながらスクリーンキャプチャを行う
- サポートされていないPCIカードをThunderbolt3 PCI ボックスで動かす
- Macに怪しげなデバイスドライバを入れたり、ドライバを改造したりする準備方法
- 作品展示の際の設定チェックシート
- Mac で USBが認識されない問題の原因、対処法